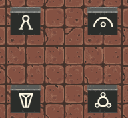
To move around use WA SD or 🡹🡸 🡻🡺.
Access the inventory and diary with I and press it again to close the menu. Navigate between the tabs with the mouse or Q and E. If there are tabs within a tab then A and D help you navigate between them or you can also just click on them with a mouse.
Interact with objects in the world by pressing K. You can also enter or leave towns and dungeons with the K key.
Do you want to adjust your walking speed? Press ⇧Shift to toggle between running and walking.
Cycle through the different map styles with M if you already learned any cartography skills.
For transcendental traveling you press P to set the pathway and by pressing T you will travel to that location.
In the battle you activate your equipped attacks by pressing the corresponding keys for each level: 1, 2, 3, and 4.
If there are multiple enemies in a battle you can cycle through the enemies with A/D or 🡸 🡺.
You start with a full life meter. You can see it in the top left corner of the screen. You can't replenish your life meter!
If your life meter hits zero, then you will lose the game and you have to start from the beginning.

Each dungeon has a special key that you need to enter the final room of the dungeon. So keep your eyes open for that key!

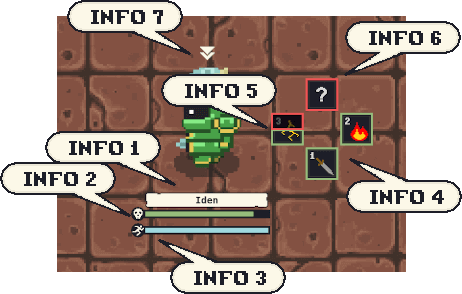
Info 1 – That label displays your name.
Info 2 – This is your battle health bar and decreases when you take damage in battle. You can replenish your battle health bar with items you find in the dungeon. If your battle health bar reaches zero, the battle is lost and you deplete one chunk of your life meter.
Info 3 – This is your battle speed bar. It slowly fills up during the battle depending on your speed. If it is fully charged, then it's your turn and you can use items and attack the enemy.
Info 4 – These are your available attacks. You can equip one attack per level and you can change the attacks during a battle when it's your turn. A green frame around one attack indicates that it's ready to be used.
Info 5 – Level 3 and level 4 attacks need to be charged before they are ready to be used. When you use level 1 and level 2 attacks you can charge up the more powerful attacks. As long as you see a (partially) red frame around an attack, it's not ready yet and still needs to be charged.
Info 6 – If you don't have an attack for a particular level equipped, then you see this placeholder symbol. Find and equip an attack to make this slot available.
Info 7 – This tiny indicator tells you whose turn it is currently.
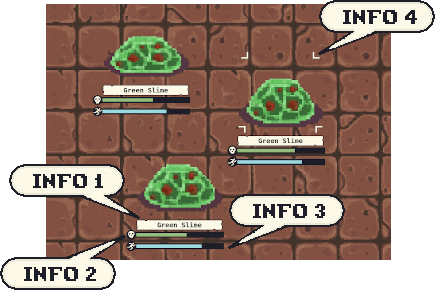
Info 1 – That label displays the name of the enemy.
Info 2 – This is the enemy's battle health bar and decreases when you deal damage to the enemy. If the enemy's battle health bar reaches zero, the enemy dies and won't participate in the battle anymore. If all enemies in a battle are defeated you will win the battle and obtain useful battle spoils afterwards.
Info 3 – This is the enemy's battle speed bar. It slowly fills up during the battle depending on the enemy's speed. If it is fully charged, then it's the enemy's turn and they will attack.
Info 4 – This tiny indicator marks the currently selected enemy. When it's your turn you can change the selection. If your attack targets all enemies, then the selection does not matter. You can't select defeated enemies.
There are seven different elements that have an influence on how strong an attack is. Each element has certain strengths and weaknesses. Observe enemy's appearance, names, and attacks that might reveal their elements. Use your knowledge collected this way to your advantage in battles against particularly strong enemies.
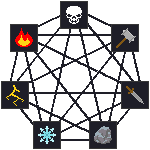
Fire easily melts Frost. Also the Fire helps purifying Gloom enemies. On the other hand, Fire is a poor choice against Rock enemies as there is little to burn. There are more elements Fire is effective against so try to use it on different enemy types and see how they react. You also might discover more weaknesses this way.
Galvanism is an excellent choice against Blunt and Piercing elements as their metal parts amplify electric charges. On the other hand, Galvanism is a poor choice against Rock and Fire enemies as there is no conducting material. There are more elements Galvanism is effective against so try to use it on different enemy types and see how they react. You also might discover more weaknesses this way.
Piercing attacks easily puncture the brittle ice crystals so use it against Frost enemies. On the other hand, Piercing is a poor choice against the heavy armor of Blunt enemies. Also against Rock enemies Piercing attacks are not effective as their puncturing effects get dampened by the hard surface. There are more elements Piercing is effective against so try to use it on different enemy types and see how they react. You also might discover more weaknesses this way.
Blunt attacks quickly smashes Rock and Frost enemies to smithereens. On the other hand, Blunt is a poor choice against Galvanism as the huge amount of metal helps conducting the electricity. There are more elements Blunt is effective against so try to use it on different enemy types and see how they react. You also might discover more weaknesses this way.
Gloom induces fear even in the strongest warriors and thus is great against Piercing and Blunt enemies. On the other hand, Gloom is negated by the purifying nature of Fire enemies. There are more elements Gloom is effective against so try to use it on different enemy types and see how they react. You also might discover more weaknesses this way.
Frost drills its icy fingers even into the most dreadful creatures and thus it's an excellent choice against Gloom enemies. Also Frost creeps into the tiniest cracks and damages Rock elements from within. There are more elements Frost is effective against so try to use it on different enemy types and see how they react. You also might discover more weaknesses this way.
Rock extinguishes Fire enemies with ease. Also Rock is great against grounding Galvanism enemies. There are more elements Rock is effective against so try to use it on different enemy types and see how they react. You also might discover more weaknesses this way.
You can move around the world freely. However, you need a ship to cross water. During your journey across the world you sometimes stumble upon useful resources like rocks, wood, insects, eggs, or fish.
There are a towns scattered across the continents. In these towns you can restock on potions at the market or sell resources you collected. Also it's always a good idea to stop by the local inn and listen to the gossip.

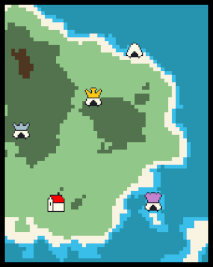
If you are in the possession of the Colossal Cartography Compendium then you can see the map of the world. The giant golden pin is your current location. The house with a red roof marks towns. The cave icons represent dungeons. Having a silver crown on the cave icon means that you finished a dungeon successfully. The golden crown on the cave icon symbolizes the fact that you completely explored the dungeon. The light purple crown marks all completely explored dungeons where you successfully defeated the boss.
You might encounter different types of puzzles in the dungeons. All of these puzzles require a slightly different approach in solving them. As a true tome traveler and adventurer you can try figuring out the solution by yourself.
Did you stumble across four huge runestones with obscure inscriptions? Standing in front of them and touching the engraving will trigger a hidden mechanism which lowers the stones into the ground. Activate them in the correct order to reveal a secret. Search the nearby rooms for hints.
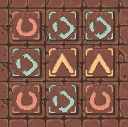
You might have seen rooms where some of the tiles have peculiar symbols on them. Interacting with one of the tiles changes them and affects all adjacent ones as well. The floor would look marvelous if all the tiles would show the same symbol. Then, the cryptic floor will give out its secret.
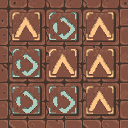
Rumor has it that a challenging variant of these cryptic floor tiles exists. The behavior is almost identical, but activating tiles alternates between more symbols than its ordinary relative. Indeed, an intriguing mystery and doubtlessly lavishly rewarding.
There is a scholar going by the name of Regshom who studied these cryptic floor tiles intensively. Apparently, Regshom deciphered the algebraic formula behind the tiles. Getting his advice most definitely brings you closer to the treasures guarded by these puzzles. However, people say that Regshom demands a hefty price for his knowledge.

Throughout your journey you will come across a broad array of books teaching you survival and battle skills. Thus most of the books will benefit your progress and might even play an essential role in your success. Some books, however, hold sinister secrets.
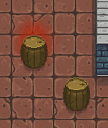
After reading the book, a vast void unfolds deep inside you. As long as this book is in your possession, you will notice a dark blue aura around certain crates, jars, and barrels. This dark aura reflects the state of the object: Unworldly emptiness.
After reading the book, your mind feels sudden comfort. As long as this book is in your possession, you will notice a bright golden aura around certain crates, jars, and barrels. This radiant aura reflects the state of the object: Worldy wealth.
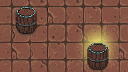
After reading the book, your inner ear picks up a distant clack of a door lock. As long as this book is in your possession, you will notice a glowing red aura around certain crates, jars, and barrels. This warming aura reflects the state of the object: Unbarred passage.
Mograv was an exceptionally gifted inventor. With her manuscripts you develop the instinctive feeling of recognizing which of the huge engraved runestones you have to activate first to make the hidden mechanism click.
The scholar Regshom deciphered the algebraic formula that sits behind the cryptic floor tiles. With the first volume you understand the ordinary variant and you know which tile to activate first. The second volume dives into the innards of the more challenging version to also master these with ease.
Scholars all over the world consider this work to be nothing but a fraud. Only a few give credence to spiritual pathways connecting two different locations. As long as this book is in your possession, you can create a temporary pathway at any location. Traveling through that pathway destabilizes it.
Written centuries ago, the Colossal Cartography Compendium is still the best series of books published for everything around maps and navigation. The first volume covers the basics, so you can map out your current location as well as all areas you have discovered so far. In the second volume you learn about the advanced techniques which helps in outlining rooms in the dungeon and you keep track of locked doors which you come across. The third volume aids you locating locked passages in advance and how to mark certain navigational support on the map. The final chapter contains ancient blueprint collections of dungeons including the entrance and exit, as well as secret chambers.
Far and near, Lophians are cherished for their tactical thinking. Also, efficient Lophian warfare is credited as one of the key drivers in the victorious outcome in the Construct Wars. As long as this book is in your possession, you gain a tactical advantage by striking first in every battle.
Maqeeto has a long lineage of sailors and thus it was just natural for her to learn everything about boats and the sea from a young age. However, the current whereabouts of Maqeeto are unclear and the book is the last thing that gives evidence that Maqeeto is real. Every copy of this book comes with a ship to instantly apply all the maritime knowledge.